STM32 Logging Over Serial
Hello you code fellows.
Recently I just shared one of my small lib I use for my works, mostly for logging.
This lib is ANSI-C compliment, and can be used in anywhere! As it won't take care about underlying IO ops.
- Cloning Repository
- Create A New STM32 Project Using STM Cube MX
- Adding
WAsys Lib LogTo Project - Integrate
WAsys Lib Logto STM32 HAL Library - Compile And Deploy(download) code
- Validating Result
Cloning Repository
Repository could be found here(https://github.com/911992/WAsys_lib_log)
Start by cloning WAsys Lib Log, or simply download the zip file from the link specified above
git clone https://github.com/911992/WAsys_lib_log.git
Create A New STM32 Project Using STM Cube MX
Open (download link) Cube MX, and follow the instructions below.
Creating a new project using ACCESS TO MCU SELECTOR or ACCESS TO BOARD SELECTOR
-
Select your MC or Board from the list, and create a new project.
Here, we have a goody good STM32F103, so I go as MC, as following.
Also check out our testing board, works like charm so far :D.
Click Start Project and proceed to next step.
-
In Pinout & Configuration tab/section, under Connectivity ,based on your board, select the correct serial(UART) interface you wish for logging.
Here, in our STM32F103RB based board, UART3 is ready for serial communication
Mind to use correct Baud Rate. Also you need to remember this config. Write it down somewhere, we need the config.
Also mind the pins related to your UART. Here for our setup, it goes
PB10for serial Transmit, andPB11for serial Receive(Which we don't need it for this test). -
Configure rest core configuration, under System Core category, sections RCC, and SYS. Here it comes for our board.
RCC
SYS, here as we are going to program our MC/board by
SWDwithout tracing.NOTE if you don't know what are(RCC and SYS) those, so leaving RCC untouched may help you to run some samples without any issues. But leaving SYS part may make the code deployment(download) faulty.
-
Go to Project Manager tab, and name your project. Also set the project location.
Don't forget to select correct Toolchain/IDE. Since we have Legendary uVision, so we got MDK-ARM V5 for good.
If you don't have any mentioned IDEs listed, so go for makefile.
-
You are almost done with Cube MX, click Generate Code button. It will generates some file on path specified, and a popup/prompt message to ask you to either Open Project(if applicable), or Open Folder. I go for Open Project.
That's it. we have done with CubeMX for now.


Adding WAsys Lib Log To Project
From here, we may go separate ways. All you need to do is adding cloned WAsys_lib_log to the project.
(If you are not doing this by MDK-ARM, so skip this section, and proceed to next step.)
-
In uVision, right click on project, and select Add Group... item
-
Rename the new group to
WAsys_lib_log, then right click on it and select Add Existing Files to group 'WAsys_lib_log'... -
Locate the cloned
WAsys Lib Logrepository, and addWAsys_logging.c(just source code).Note: DO NOT ADD file
WAsys_logging_usage_demo.c -
Now, you have to add the same source file as
include path, in order to let/inform compiler findWAsys_logging.hheader file.Right click on project again, and this time, select Options for ... item, or simple
Alt + F7 -
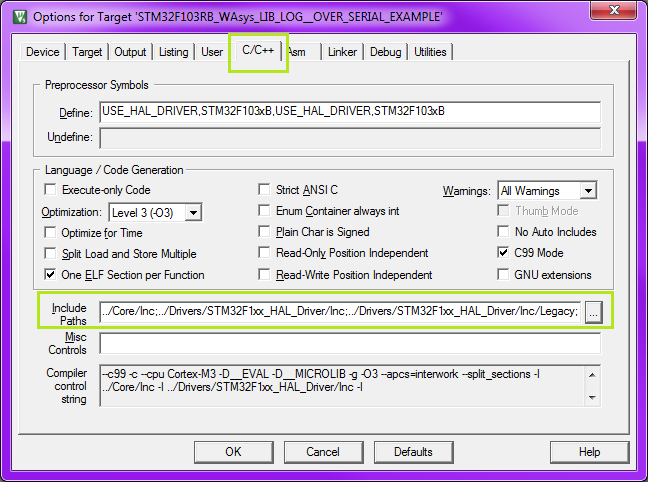
Locate to C/C++ tab, and add folder(repository) that contains
WAsys_logging.hheader file.And you have done at IDE/uVision part, proceed to next level.


Integrate WAsys Lib Log to STM32 HAL Library
We are almost there, just code some stuff, compile and see stuffs in action.
-
Locate and open
main.cfile. You need to implement followings functions.include
WAsys_logging.hheader file/*main.c file*/ ... /* Private includes ----------------------------------------------------------*/ /* USER CODE BEGIN Includes */ #include "WAsys_logging.h" /* USER CODE END Includes */ ...
Code a function that follows
WAsys_LOGGING_NATIVE_IO_CALLBACK_FUNC_Ttype. It writes down any given argument(input message) to target serial interface(here it's UART3 for our board).... /* Private variables ---------------------------------------------------------*/ /*handler to point out UART3 interface, Cube MX codes it*/ UART_HandleTypeDef huart3; /* USER CODE BEGIN PV */ ... /* Private user code ---------------------------------------------------------*/ /* USER CODE BEGIN 0 */ ... /*Default signature for serial read/write timeout*/ #define _WAsys_DEF_UART_TIMEOUT_MS 512 /*function must follow WAsys_LOGGING_NATIVE_IO_CALLBACK_FUNC_T type*/ static void WAsys_STM32_serial_log(char *arg_buff, size_t arg_len){ /*Sending the given log value to UART3 interface*/ HAL_UART_Transmit(&huart3,(uint8_t*)arg_buff,arg_len,_WAsys_DEF_UART_TIMEOUT_MS); } ... /* USER CODE END 0 */ ...-
Code a function that follows
WAsys_LOGGING_NATIVE_SYSTEM_TIMESTAMP_FUNC_Ttype. It must provide system current timestamp.Note if you don't need timestamp for each log record, so you don't need having this function.
...
/* Private user code ---------------------------------------------------------*/
/* USER CODE BEGIN 0 */
...
/*function must follow WAsys_LOGGING_NATIVE_SYSTEM_TIMESTAMP_FUNC_T type*/
static time_t WAsys_STM32_current_timestamp(void){
 /*Get current sys tick(default in ms)*/
 time_t _t=(time_t)HAL_GetTick();
 /*Sys tick is in ms(by default), WAsys needs timestamp in seconds*/
 return _t/1000;
}
...
/* USER CODE END 0 */
-
Now, instance one
WAsys_LOGGING_CONF_T, and pass it toWAsys_logging_init()function.Locate
main.cfile again, and before programm main loop(while(true){...}) initialize theWAsys Lib Log... int main(void) { ... /* USER CODE BEGIN 2 */ /*Type for initializing*/ WAsys_LOGGING_CONF_T _WAsys_log_conf_ins; /*Setting IO log callback*/ _WAsys_log_conf_ins.callback_func=WAsys_STM32_serial_log; /*Setting system timestamp callback*/ _WAsys_log_conf_ins.system_ts_func= WAsys_STM32_current_timestamp; /*Setting timestamp enabled*/ _WAsys_log_conf_ins.including_timestamp = 1; /*Initializing WAsys Lib Log for good */ WAsys_logging_init(_WAsys_log_conf_ins); /* USER CODE END 2 */ ...NOTE: since there is no
STDOUTin STM32 HAL, so callingWAsys_logging_init_default()orWAsys_logging_init_default_timestamp()may result aHARD FAULT -
Log something, in application main loop, and it ready for compiling.
...
int main(void)
{
...
/* USER CODE BEGIN WHILE */
  while (1)
  {
    /*same as WAsys_log(...), sample usage*/
    log("Hello from STM32!");
    /*formatted log sample*/
    logf("--Sys ticks :%d--\n",HAL_GetTick());
    /*Wait for 1024 ms (Because 1000 is too mainstream)*/
    HAL_Delay(1024);
    /* USER CODE END WHILE */
    /* USER CODE BEGIN 3 */
  }
  /* USER CODE END 3 */
...
}/*main-end*/
...
Compile And Deploy(download) code
Grab and prepare your MC programmer, compile and deploy the code. For those using uVision like us, considering following steps.
-
Note: By default, Cube MX sets ST-Link programmer when it generates a new project. So if you have another programmer (like J-Link), you have to set it in project properties.
Right click on project, and select Options for ... or using
Alt + F7, then in Debug tab, make sure your programmer is set.-
If you board comes without any hard reset button(like ours), so you would ask programmer to restart MC when new program gets downloaded.
FOr doing this, click Settings button, then Flash Download tab, activate Reset and Run checkbox.
Compile the project by
F7key, or associated icon.Check out output panel, to make sure you have compiled your project successfully. It must comes with zero errors and warnings. Considering sample output as following.
Rebuild started: Project: STM32F103RB_WAsys_LIB_LOG__OVER_SERIAL_EXAMPLE
*** Using Compiler 'V5.06 update 6 (build 750)', folder: '<<WAsys>>\ARMCC\Bin'
Rebuild target 'STM32F103RB_WAsys_LIB_LOG__OVER_SERIAL_EXAMPLE'
compiling WAsys_logging.c...
assembling startup_stm32f103xb.s...
compiling stm32f1xx_hal_gpio_ex.c...
compiling main.c...
compiling stm32f1xx_hal_msp.c...
compiling stm32f1xx_it.c...
compiling stm32f1xx_hal_tim.c...
compiling stm32f1xx_hal_tim_ex.c...
compiling stm32f1xx_hal.c...
compiling stm32f1xx_hal_uart.c...
compiling stm32f1xx_hal_flash.c...
compiling stm32f1xx_hal_pwr.c...
compiling stm32f1xx_hal_rcc_ex.c...
compiling stm32f1xx_hal_cortex.c...
compiling stm32f1xx_hal_gpio.c...
compiling stm32f1xx_hal_flash_ex.c...
compiling stm32f1xx_hal_rcc.c...
compiling stm32f1xx_hal_dma.c...
compiling stm32f1xx_hal_exti.c...
compiling system_stm32f1xx.c...
linking...
Program Size: Code=8312 RO-data=392 RW-data=28 ZI-data=1212
FromELF: creating hex file...
"STM32F103RB_WAsys_LIB_LOG__OVER_SERIAL_EXAMPLE\STM32F103RB_WAsys_LIB_LOG__OVER_SERIAL_EXAMPLE.axf" - 0 Error(s), 0 Warning(s).
Build Time Elapsed:  00:00:09
-
Make sure you have powered up your board, connected it properly to programmer, and hit the download button (or
)Checkout output panel, it should greet you with some success message like following.
Load "STM32F103RB_WAsys_LIB_LOG__OVER_SERIAL_EXAMPLE\\STM32F103RB_WAsys_LIB_LOG__OVER_SERIAL_EXAMPLE.axf"
Erase Done.
Programming Done.
Verify OK.
Application running ...
Flash Load finished at 00:00:00
GREAT, now checkout serial interface, happy logging!


Validating Result
You now would grab the logging for validating, to make sure that your project works.
One good solution is grabbing a good Oscilloscope, and trace the serial interface for good.
For more budget solution, we suggest you grab one PCI-E Serial/COM card, or simply a legendary USB-to-Serial device. They are so cheap, and works. But Note you get the correct one, not all of them come with good drivers.
Here I have one USB-To-Serial device, and simply using legendary putty, I could validate my MC and code are working like charm

Hope you find this article hopeful, thanks for reading. Feel free to ask any question, we will be happy to help(if we can), also sharing this page will be a much appreciated.
Happy Programming